마이바티스와 스프링 연동
1. web.xml 파일
web.xml파일에서 마이바티스 설정을 지정하는 XML 파일을 읽을 수 있게 경로를 contextConfigLocation에 추가해준다. 추가로 스프링 웹 요청과 응답에 대한 한글 인코딩 처리를 위해 CharacterEncodingFilter도 함께 추가해준다.
<?xml version="1.0" encoding="UTF-8"?>
<web-app version="3.1" xmlns="http://java.sun.com/xml/ns/javaee"
	xmlns:xsi="http://www.w3.org/2001/XMLSchema-instance"
	xsi:schemaLocation="http://java.sun.com/xml/ns/javaee https://java.sun.com/xml/ns/javaee/web-app_3_1.xsd">

	<!-- 한글 처리 -->
	<filter>
		<filter-name>encodingFilter</filter-name>
		<filter-class>org.springframework.web.filter.CharacterEncodingFilter</filter-class>
		<init-param>
			<param-name>encoding</param-name>
			<param-value>UTF-8</param-value>
		</init-param>
		<init-param>
			<param-name>forceEncoding</param-name>
			<param-value>true</param-value>
		</init-param>
	</filter>
	<filter-mapping>
		<filter-name>encodingFilter</filter-name>
		<url-pattern>/*</url-pattern>
	</filter-mapping>

	<!-- The definition of the Root Spring Container shared by all Servlets and Filters -->
	<context-param>
		<param-name>contextConfigLocation</param-name>
		<param-value>
			classpath*:/config/context-*.xml
			/WEB-INF/spring/root-context.xml
		</param-value>
	</context-param>

	<!-- Creates the Spring Container shared by all Servlets and Filters -->
	<listener>
		<listener-class>org.springframework.web.context.ContextLoaderListener</listener-class>
	</listener>

	<!-- Processes application requests -->
	<servlet>
		<servlet-name>appServlet</servlet-name>
		<servlet-class>org.springframework.web.servlet.DispatcherServlet</servlet-class>
		<init-param>
			<param-name>contextConfigLocation</param-name>
			<param-value>/WEB-INF/spring/appServlet/servlet-context.xml</param-value>
		</init-param>
		<load-on-startup>1</load-on-startup>
	</servlet>

	<servlet-mapping>
		<servlet-name>appServlet</servlet-name>
		<url-pattern>/</url-pattern>
	</servlet-mapping>

</web-app>
classpath*:/config/context-*.xml처럼 적어주면 일일이 XML 파일 추가되더라도 context-*(아무이름).xml에 해당하는 파일 모두를 읽어 올 수 있다. classpath:/는 src/main/resources 폴더를 말한다.
2. context-datasource.xml 파일
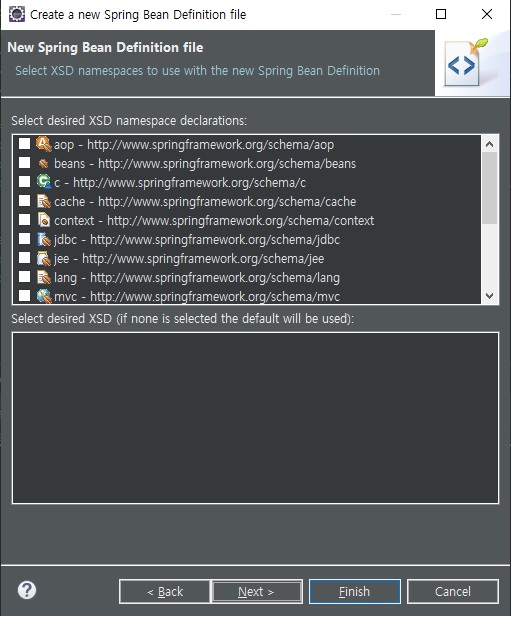
src/main/resources/폴더 하위에 config 폴더를 생성 후 context-datasource.xml 파일에 dataSource를 추가해준다. xml 파일 생성 시 현재 폴더 위치에서 마우스 우클릭 후 New -> Spring Bean Configuration File로 해주면 사용할 네임스페이스 스키마 까지 미리 선택하여 생성할 수 있다.


<?xml version="1.0" encoding="UTF-8"?>
<beans xmlns="http://www.springframework.org/schema/beans"
	xmlns:xsi="http://www.w3.org/2001/XMLSchema-instance"
	xmlns:context="http://www.springframework.org/schema/context"
	xmlns:mybatis-spring="http://mybatis.org/schema/mybatis-spring"
	xmlns:tx="http://www.springframework.org/schema/tx"
	xsi:schemaLocation="http://mybatis.org/schema/mybatis-spring http://mybatis.org/schema/mybatis-spring-1.2.xsd
		http://www.springframework.org/schema/beans http://www.springframework.org/schema/beans/spring-beans.xsd
		http://www.springframework.org/schema/context http://www.springframework.org/schema/context/spring-context-4.3.xsd
		http://www.springframework.org/schema/tx http://www.springframework.org/schema/tx/spring-tx-4.3.xsd">

	<bean class="org.springframework.beans.factory.config.PropertyPlaceholderConfigurer">
		<property name="location" value="classpath:/jdbc.properties" />
	</bean>

	<bean id="dataSource" class="org.springframework.jdbc.datasource.DriverManagerDataSource">
		<property name="driverClassName" value="${jdbc.driver}"/>
		<property name="url" value="${jdbc.url}"/>
		<property name="username" value="${jdbc.username}"/>
		<property name="password" value="${jdbc.password}"/>
	</bean>

	<!-- Transaction Manager -->
	<bean id="transactionManager" class="org.springframework.jdbc.datasource.DataSourceTransactionManager">
		<property name="dataSource" ref="dataSource"/>
	</bean>
	<tx:annotation-driven transaction-manager="transactionManager"/>
</beans>
PropertyPlaceholderConfigurer 클래스를 빈으로 등록하면 외부의 프로퍼티(properties)에 저장된 파일을 불러올 수 있다. <property name="location" value="classpath:/jdbc.properties" />는 외부 프로퍼티 파일을 지정할 수 있다. 추가로 경로 지정 방법에는 한 가지가 더 있다.
<!-- 첫번째 방법 -->
<bean class="org.springframework.beans.factory.config.PropertyPlaceholderConfigurer">
	<property name="location" value="classpath:/jdbc.properties" />
</bean>

<!-- 두번째 방법 -->
<context:property-placeholder location="classpath:/jdbc.properties"/>
두 가지 중 한 개 방법을 이용하면 된다. <context: 태그를 사용하기 위해서는 상단에 context에 관련된 네임스페이스와 스키마를 추가해줘야 한다.
xmlns:context="http://www.springframework.org/schema/context"
3. context-mybatis.xml 파일
src/main/resources/config 폴더 안에 context-mybatis.xml 파일을 추가한다.
<?xml version="1.0" encoding="UTF-8"?>
<beans xmlns="http://www.springframework.org/schema/beans"
	xmlns:xsi="http://www.w3.org/2001/XMLSchema-instance"
	xmlns:context="http://www.springframework.org/schema/context"
	xmlns:jdbc="http://www.springframework.org/schema/jdbc"
	xmlns:mybatis-spring="http://mybatis.org/schema/mybatis-spring"
	xsi:schemaLocation="http://www.springframework.org/schema/jdbc http://www.springframework.org/schema/jdbc/spring-jdbc-4.3.xsd
		http://mybatis.org/schema/mybatis-spring http://mybatis.org/schema/mybatis-spring-1.2.xsd
		http://www.springframework.org/schema/beans http://www.springframework.org/schema/beans/spring-beans.xsd
		http://www.springframework.org/schema/context http://www.springframework.org/schema/context/spring-context-4.3.xsd">

	<bean id="sqlSessionFactory" class="org.mybatis.spring.SqlSessionFactoryBean">
		<property name="dataSource" ref="dataSource"/>
		<property name="configLocation" value="classpath:/config/mybatis-config-base.xml"/>
		<property name="mapperLocations" value="classpath:/mappers/*.xml"/>
	</bean>

	<bean class="org.mybatis.spring.mapper.MapperScannerConfigurer">
		<property name="basePackage" value="com.jdevil.service" />
		<property name="sqlSessionFactoryBeanName" value="sqlSessionFactory"/>
	</bean>

</beans>
spring.SqlSessionFactoryBean객체를 선언하면서 configLocation의 value값으로 마이바티스 config 위치와 mapperLocations의 value 값으로 mapper 있는 경로를 지정해준다. mapper경로 안에 있는 xml 파일은 실제 사용되는 sql 파일이 작성되는 곳이다.
MapperScannerConfigurer 객채는 자동으로 mapper를 스캔해주는 설정이다. 빈으로 등록하는 방법 말고 상단에 네임스페이스로 등록해둔 myabtis-spring: 엘리먼트를 사용하여 설정할 수도 있다. 그 외 방법으로 @MapperScan 어노테이션을 이용할 수도 있다.
<!-- 방법1 -->
<bean class="org.mybatis.spring.mapper.MapperScannerConfigurer">
	<property name="basePackage" value="com.jdevil.service" />
	<property name="sqlSessionFactoryBeanName" value="sqlSessionFactory"/>
</bean>

<!-- 방법2 -->
<mybatis-spring:scan base-package="com.jdevil.service" factory-ref="sqlSessionFactory"/>
4. jdbc.properties 파일
src/main/resources/ 폴더 안에 jdbc.properties 파일을 추가한다. 외부 프로퍼티 파일이다. 디비 아이디와 비밀번호는 로컬에 설치되어있는 디비 정보를 jdbc.username, jdbc.password에 각각 적어준다.
jdbc.driver = net.sf.log4jdbc.sql.jdbcapi.DriverSpy
jdbc.url = jdbc:log4jdbc:mariadb://localhost:3306/test
jdbc.username = root
jdbc.password = test
4-1. log4jdbc.log4j2.properties 파일
src/main/resources/ 폴더 안에 log4jdbc.log4j2.properties 파일을 추가한다. log4jdbc를 이용하면 DB에러 발생 시 쿼리 로그를 볼 수 있다.
log4jdbc.drivers=org.mariadb.jdbc.Driver
log4jdbc.spylogdelegator.name=net.sf.log4jdbc.log.slf4j.Slf4jSpyLogDelegator
log4jdbc.dump.sql.maxlinelength=0
4-2. logback.xml 파일
src/main/resources/ 폴더 안에 logback.xml파일을 추가한다. 출력할 로그 옵션들을 설정할 수 있다.
<?xml version="1.0" encoding="UTF-8"?>
<configuration>
	<include resource="org/springframework/boot/logging/logback/base.xml"/>
	<!-- log4jdbc-log4j2 -->
	<logger name="jdbc.sqlonly" 		level="DEBUG"/>
	<logger name="jdbc.sqltiming" 		level="INFO"/>
	<logger name="jdbc.audit" 			level="WARN" />
	<logger name="jdbc.resultset" 		level="ERROR"/>
	<logger name="jdbc.resultsettable" 	level="ERROR"/>
	<logger name="jdbc.connection" 		level="INFO"/>
<typeAliases></typeAliases>
</configuration>
5. mybatis-config-base.xml 파일
src/main/resources/config 폴더 안에 mybatis-config-base.xml 파일을 추가한다.
<?xml version="1.0" encoding="UTF-8"?>
<!DOCTYPE configuration
  PUBLIC "-//mybatis.org//DTD Config 3.0//EN"
  "http://mybatis.org/dtd/mybatis-3-config.dtd">
<configuration>
	<settings>
		<!-- mybatis cache 사용여부 -->
	  	<setting name="cacheEnabled" value="true"/>
	  	<!-- 지연로딩 사용여부 -->
	  	<setting name="lazyLoadingEnabled" value="false"/>
	  	<!-- 한 개의 구문에서 여러 개의 ResultSet을 허용할지 여부 -->
	  	<setting name="multipleResultSetsEnabled" value="true"/>
	  	<!-- 컬럼명 대신 컬럼 라벨을 사용 -->
	  	<setting name="useColumnLabel" value="true"/>
	  	<!-- 생성키에 대한 JDBC 지원 허용 여부 -->
	  	<setting name="useGeneratedKeys" value="false"/>
	  	<!-- 디폴트 Executor 설정(SIMPLE은 특별히 동작하는 것은 업음) -->
	  	<setting name="defaultExecutorType" value="SIMPLE"/>
	  	<!-- DB 응답 타임아웃 설정 -->
	  	<setting name="defaultStatementTimeout" value="25000"/>
	  	<!-- 전통적 DB 컴럼명을 JAVA의 Camel표기법으로 자동 매핑 설정 -->
	  	<setting name="mapUnderscoreToCamelCase" value="true"/>
	</settings>
	<typeAliases>
		<package name="com.jdevil.vo"/>
	</typeAliases>
</configuration>
6. testMapper.xml 파일
src/main/resources/폴더 하위에 mappers폴더를 성생 후 testMapper.xml 파일을 추가한다.
<?xml version="1.0" encoding="UTF-8"?>
<!DOCTYPE mapper PUBLIC "-//mybatis.org//DTD Mapper 3.0//EN" "http://mybatis.org/dtd/mybatis-3-mapper.dtd">

<mapper namespace="com.jdevil.service.TestMapper">

	<select id="selectNow" resultType="string">
	<![CDATA[
		SELECT NOW()
	]]>
	</select>

</mapper>
7. TestMapper.java 파일
src/main/java 폴더 안에 www.com.jdevil.service 패키지안에 TestMapper.java 인터페이스 파일을 생성한다.
package com.jdevil.service;

import org.apache.ibatis.annotations.Mapper;
import org.springframework.stereotype.Repository;

@Mapper
@Repository(value = "testMapper")
public interface TestMapper {
	public String selectNow() throws Exception;
}
8. TestService.java 파일
src/main/java 폴더 안에 www.com.jdevil.service 패키지안에 TestService.java 클래스 파일을 생성한다.
package com.jdevil.service;

import javax.annotation.Resource;
import org.springframework.stereotype.Service;

@Service(value = "testService")
public class TestService {
	@Resource(name = "testMapper")
	private TestMapper testMapper;

	public String selectNow() throws Exception {
		return testMapper.selectNow();
	}
}
9. TestController.java 파일
src/main/java 폴더 안에 www.com.jdevil.controller 패키지안에 TestController.java 클래스 파일을 생성한다.
package com.jdevil.controller;

import javax.annotation.Resource;
import org.slf4j.Logger;
import org.slf4j.LoggerFactory;
import org.springframework.stereotype.Controller;
import org.springframework.ui.Model;
import org.springframework.web.bind.annotation.RequestMapping;
import org.springframework.web.bind.annotation.RequestMethod;
import com.jdevil.service.TestService;

@Controller
public class TestController {

	private static final Logger logger = LoggerFactory.getLogger(TestController.class);

	@Resource(name = "testService")
	private TestService testSvc;

	@RequestMapping(value = "/", method = RequestMethod.GET)
	public String home(Model model) throws Exception {

		String time = testSvc.selectNow();

		model.addAttribute("time", time);

		return "test";
	}
}
10. test.jsp
src/main/webapp/WEB-INF/views/ 폴더 안에 test.jsp 파일을 생성한다.
<%@ page language="java" contentType="text/html; charset=UTF-8" pageEncoding="UTF-8"%>
<%@ taglib uri="http://java.sun.com/jsp/jstl/core" prefix="c"%>
<%@ taglib uri="http://java.sun.com/jsp/jstl/fmt" prefix="fmt"%>
<!DOCTYPE html>
<html>
<head>
	<meta http-equiv="Content-Type" content="text/html; charset=UTF-8">
	<title>test page</title>
</head>
<body>
	<h1>Hello TEST!!</h1>
	<p>select now : ${ time }</p>
</body>
</html>
최종 프로젝트 폴더구조이다.

이제 빌드 후 서버로 실행시켜주면 결과를 볼 수 있다. Hello TEST!!

프로젝트 깃 허브 주소 : https://github.com/jdevil0313/spring-mybatis-basic-project
'SPRING' 카테고리의 다른 글
| Validator 클래스에서 Service객체 의존성 주입 방법 (0) | 2020.06.29 |
|---|---|
| lombok 사용 시 두번째 단어 대문자 일 경우 EL 표현식에서 객체 접근 시 javax.el.PropertyNotFoundException일 경우 (0) | 2020.05.17 |
| 스프링 프로젝트 생성방법 (0) | 2020.05.03 |
| 이클립스 톰캣 연동 (0) | 2020.05.01 |
| request로 넘어온 parameter 이름 확인 방법 (0) | 2020.04.22 |


댓글